Configuring an Oracle VM on a Mac
05-December-2014
05December
However, as with all things, the first time setup takes a little research and planning - as changes to some configuration settings, and other customisations, may be required depending on what you want the system to do. In my case I wanted the Oracle database to be accessible from the Mac Mini host, as well as other computers on my home network (e.g. my Macbook Pro) via Oracle sqlplus and SQL Developer - plus I wanted the database accessible to PHP (via the OCI8 utility) which is also running on the Mac Mini so that I could experiment creating simple browser-based applications. The best way of achieving this is to have the VM accessible via its own dedicated network IP address. Other users may prefer a host-only configuration whereby the VM is invisible to the network (i.e. no dedicated IP address) but is still accessible via the host’s IP.
For the record, my configuration is:
- Late-2014 Mac Mini i7 with 16Gb memory, and a 1Tb non-Fusion hard drive.
- The slower (non-Fusion and non-SSD) storage isn’t a big problem for me. Although the new Mac Mini doesn’t allow for subsequent memory upgrades, and sadly dropped the option of a quad-core CPU, I figured that swapping the hard disk downstream for a 1 or 2Tb SSD wouldn’t be such an issue.
- OS X 10.10 (Yosemite).
Step 1: Installing Oracle VirtualBox
 VirtualBox is a free virtualization package from Oracle. It’s not as full-featured or high performing as Parallels or VMWare Fusion (see this comparative review), but its a great place to start, and is perfect for trialling Oracle software since this is the standard for their pre-built images. The software can be downloaded from Oracle’s VirtualBox website
https://www.virtualbox.org
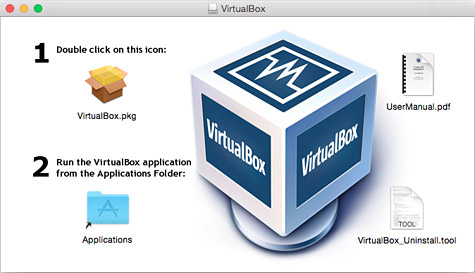
Once you’ve downloaded and opened the Mac OS X disk image, simply double-click on the installer package. This copies VirtualBox into your Applications folder, making it available for use.
Step 2: Downloading and installing Oracle VM images
Oracle makes its products available as virtual images for trial and evaluation. Just be aware these aren’t supported and should NOT be used as the basis for implementing systems. Nonetheless, they’re an invaluable resource for developer experimentation and education. These let you can gain experience with the latest versions of Oracle database, Oracle Business Intelligence (OBIEE), Oracle Data Integrator (ODI) and much more. The tools are generally installed on an Oracle Unbreakable Linux VM, with the Gnome Desktop GUI which should be readily usable by most Windows and Mac users.
Visit the Oracle developer VM download page:
- Oracle VM images are large downloads. Some reach up to 30Gb.
- The largest downloads are broken up into multiple parts, sometimes in .7z format. In the event you can’t open these with the usual Unarchiver and StuffIt utilities, Keka is recommended as a good alternative supporting both the .7z format (among others) and multi-file archives.
To run these VM images, you’ll need a Mac with 8Gb or more of memory, plus a large amount of available disk space - sufficient enough for the VM and whatever has been provisioned to be available within that VM image. For example, the current Oracle BI Sample Apps image needs 96Gb of disk. This includes 29Gb for the unzipped .vmdk file, and 67Gb allocated to the imported image.
To import a VirtualBox virtual machine:

Go to the File menu
Choose Import Appliance
Choose Import Appliance
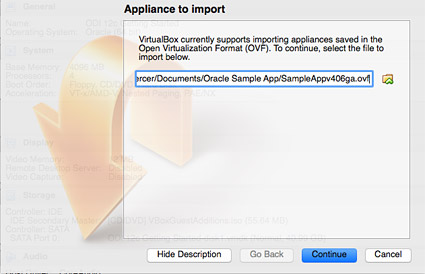
Select the .OVF or .OVA file to be imported, then choose Continue
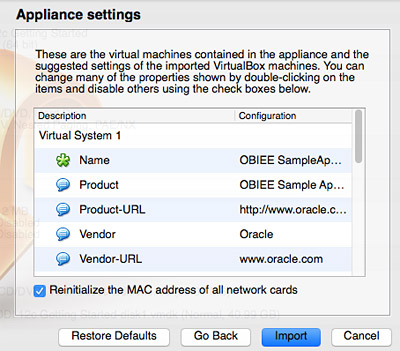
This will display the settings for the appliance being imported.
- Tick the option to reinitialize the MAC address.
- Click Import

This launches the import process for the new VM. Note this can take considerable time based on the size of the file being imported.
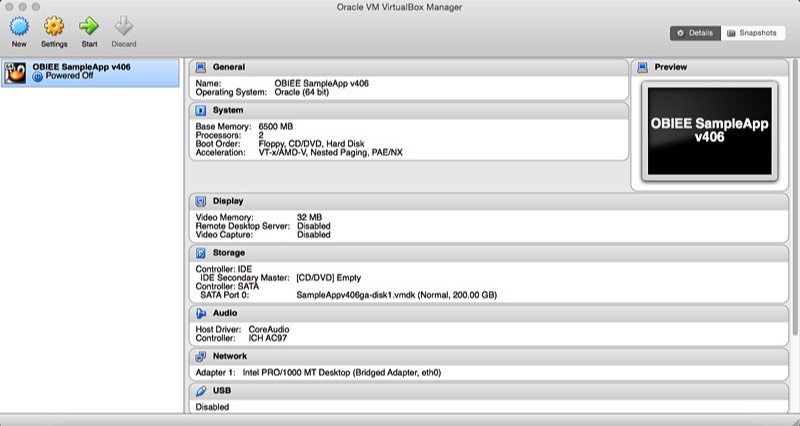
Once the import is complete, the VM details will be displayed.
Click Start on the toolbar to Open the VM.
Click Start on the toolbar to Open the VM.
Step 3: Choose a VirtualBox Network Configuration
The most important configuration option for your VM is the network setting. As this Short Guide to networking in VirtualBox explains, there are essentially three main options choose from (albeit with some variations):
- Bridged Network. This gives your Virtual Machine a separate network identity (i.e. it’s own IP address), independent from your host machine. In my case this was the best option since it makes for easier configuration of TNS and the Oracle database listener.
- Network Address Translation (NAT). This also allows you to to access the Oracle database, via your host’s IP address and port forwarding rules. I found this was fine for direct connections to the database via SQL Developer, but didn’t work so well for sqlplus and OCI8. The resulted in the error
ORA-12541: TNS: No Listener
. The root cause of this was that the listener.ora file configured on the VM needs to be using the same host name or IP address being referenced by the external machines connecting to it.
- Host-Only.This is used if you want to create VMs accessible only on your host.
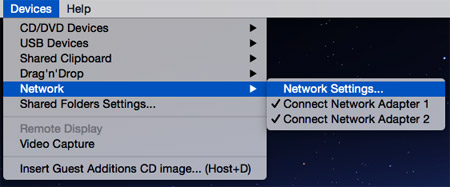
Start the Virtual Machine imported above in Step 2. From the Devices menu, select:
- Network then
- Network Settings
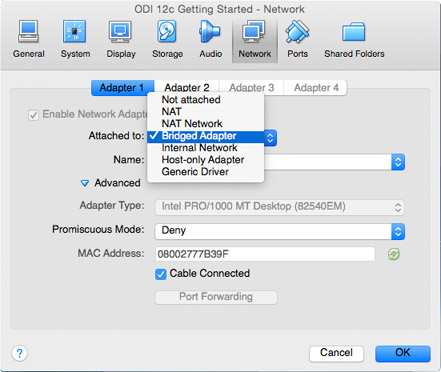
Two network adapters are generally enabled. You’ll need to select an adapter type corresponding with how you want the VM to be accessed.
Bridged Adapter seems to be the default.
Bridged Adapter seems to be the default.
- This allows you to assign an IP address to the VM, independent of the host.
- This seems to be best for configuring TNS, allowing other computers to access the Oracle database within your VM via SQLPlus
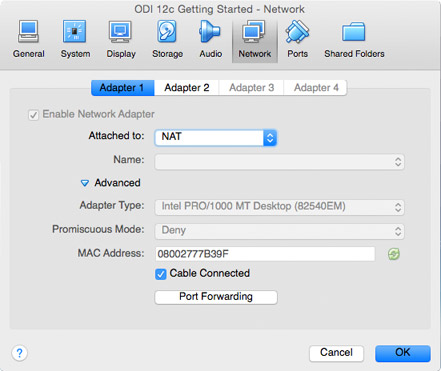
The NAT (Network Address Translation) option allows you to configure the VM without allocating another IP address. This still allows other computers to connect to the Oracle database with your VM (e.g. using Oracle SQL Developer) - but:
- They’ll need to use the IP address of your host.
- You’ll need to set to set Port Forwarding rules (more on this later)
Step 4: Enable Firewall Connectivity for Oracle VM
Within your VM, you’ll need to enable incoming network connectivity to pass the firewall. For a simple system used within a private (trusted) home network and which won’t be connecting out to the Internet, the easiest solution may be simply to disable the firewall. Alternatively, you can retain the firewall but open TCP communication on specific ports such as 1521 (default used by the Oracle database) and 22 (default used for SSH connections through Mac Terminal, PuTTY, and sFTP).
Note: the standard oracle user (default user in the pre-built VM) may have insufficient privileges to change these settings directly, and you may need to switch to the root user.
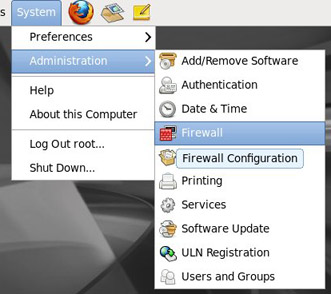
Within the Oracle VM, go to the System menu. Choose:
- Administration then
- Firewall
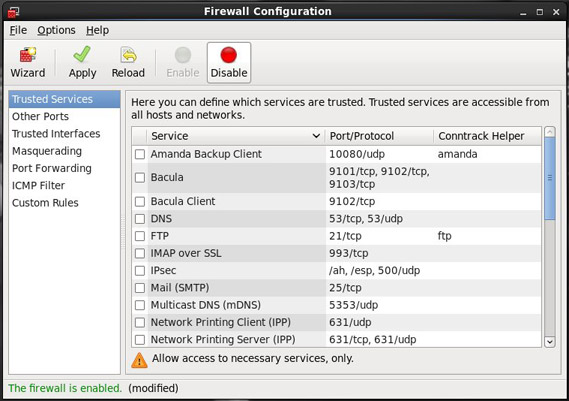
One option is simply to disable the firewall. This is the simplest way of opening up connectivity - and is fine if the VM is installed on a private network, with little or no external Internet browsing.
Turning off the firewall may also be the simplest option if the Oracle products you’re evaluating include more than just the Oracle database.
Turning off the firewall may also be the simplest option if the Oracle products you’re evaluating include more than just the Oracle database.
This may be a safer alternative - especially if there are other users on your network, or there’s a likelihood that the VM will also be used for Internet browsing.
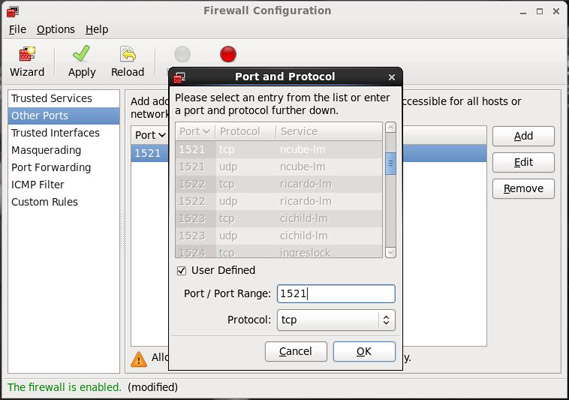
Select Other Ports and manually add entries for ports to be made accessible.
If your VM includes other Oracle products (e.g. ODI, Enterprise Manager, and Weblogic Console) that you wish to connect to, then other ports will need to be identified and opened.
Select Other Ports and manually add entries for ports to be made accessible.
- Select the User Defined tick box
- Select the TCP protocol
If your VM includes other Oracle products (e.g. ODI, Enterprise Manager, and Weblogic Console) that you wish to connect to, then other ports will need to be identified and opened.
If you’re unable to change firewall settings from the GUI for any reason, the firewall in Oracle Linux can also be disabled from the command line (noting that you’ll need to
Enter the following commands:
suor
sudoto gain suitable privileges).
Enter the following commands:
service iptables stop
chkconfig iptables off
The first command stops the iptables service (i.e. the firewall), and the second command stops the service from starting automatically when you restart your computer. Further details can be found in the Oracle Linux Firewall Configuration documentation.
Step 5: Update Oracle VM Network Settings (Bridged Network)
This is ONLY applicable if you’ve selected a Bridged Network option.
Skip this if you’ve chosen the NAT option.
For Bridged Networks you’ll need to allocate a network address (or DHCP lookup) compatible with your home or office network. This means updating the network configuration settings within the Oracle VM. Assuming the VM is using Oracle Linux, the settings can be updated following the process below. As per Step 4, the standard Oracle user may have insufficient privileges to change the network settings, requiring you to switch to the root user.
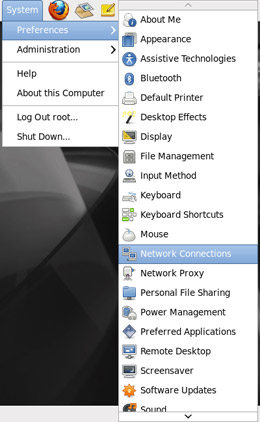
Within the Oracle VM, choose the System menu, then:
- Preferences
- Network Connections
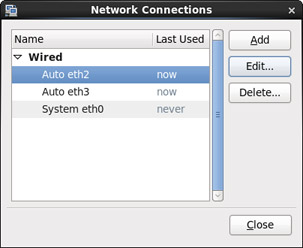
This displays the available network connections. There are generally two, plus the system connection.
- Highlight the first entry.
- Choose Edit to update the settings
- Repeat for the second entry (optional).
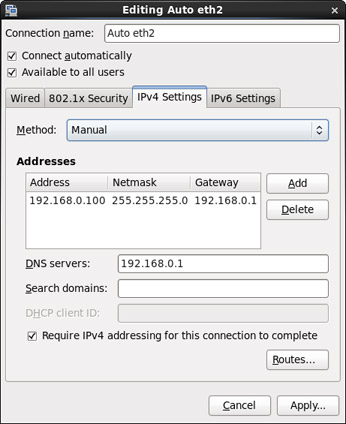
For each network adapter, manually specify:
e.g.
- Network address
- Netmask
- Gateway and
- DNS
e.g.
192.168.0.100and
192.168.0.101
Step 6: Update Oracle VM HOSTS and LISTENER.ORA files (Bridged Network)
This is also ONLY applicable if using the Bridged Network option.
Skip this if you’ve selected the NAT option.
This step ensures your system’s
hostsand
listener.orafiles are configured with the same network address as defined in Step 5.
- Ensuring the hostname is correctly associated with your IP address, and is consistently referenced in the
listener.ora
file, is essential for the database listener to be accessible from other computers on your network using SQLPlus.
- If incorrectly specified (or you’ve opted for NAT), SQLPlus connections from other computers will result in the error
ORA-12541: TNS: No Listener
suor
sudoon the command line) to ensure you have sufficient privileges to edit these files.
/etc/hosts
Update
/etc/hostsso your manually-assigned IP address is directly associated with your Oracle VM’s hostname. The hostname of your pre-built Oracle VM is defined within the VM build, and is best not changed in case the installed Oracle products are dependent on it. In this case, the VM being use is Oracle’s ODI Getting Started VM (having the hostname “ODIGettingStarted”).
127.0.0.1      localhost localhost.localdomain localhost4 localhost4.localdomain4
::1            localhost localhost.localdomain localhost6 localhost6.localdomain6
192.168.0.100  ODIGettingStarted
tnsnames.ora
The
listener.orafile is located in network/admin directory under the VM’s ORACLE_HOME. This will vary slightly based on the Oracle database version and VM build. For this example its located in
/u01/app/oracle/product/11.2.0/orcl/network/admin
The TNS entry should use either the hostname or the externally visible IP address.
Note: If specifying hostname within
listener.oraremember to update the /etc/hosts files on your other computers. If you plan using them to access your database they’ll need a corresponding entry (as per the hosts file edited above) so they can resolve the hostname to the correct IP address.
# listener.ora Network Configuration File:
# /u01/app/oracle/product/11.2.0/orcl/network/admin/listener.ora
# Generated by Oracle configuration tools.

ADR_BASE_LISTENER_ORCL = /u01/app/oracle

LISTENER =
  (DESCRIPTION_LIST =
    (DESCRIPTION =
      (ADDRESS = (PROTOCOL = TCP)(HOST = ODIGettingStarted)(PORT = 1521))
      (ADDRESS = (PROTOCOL = IPC)(KEY = EXTPROC1521))
    )
  )

DEFAULT_SERVICE_LISTENER = (ORCL)
Once the files have been updated, restart (i.e. reboot) the Oracle VM for the changes to take effect. Once restarted, open a terminal window and execute the
ifconfigcommand. This displays network interface details - including (we hope) the new manually-allocated IP addresses.

Once the changes have been made:
- Restart the Oracle VM.
- Execute the
ifconfig
command to display network interface details.
- Verify that the new IP address has taken effect.
Step 7: Port Forwarding Rules (NAT Network)
This step is applicable ONLY if you’ve used the NAT option.
Step this step if using the Bridged Network option.
- When Network Address Translation (NAT) is being used, the Oracle VM doesn’t have its own network address.
- Instead, Oracle clients elsewhere on your network need to connect to the Oracle VM via the IP address of the physical host.
- This then requires Port Forwarding rules to be defined so the VirtualBox (and the host computer) know to forward traffic onto the VM.
Firstly, you’ll need to know the IP address internally referenced by the VM.
This can be displayed by executing
ifconfigwithin a terminal window.
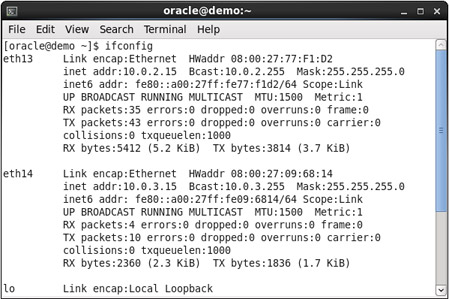
This shows the results of
ifconfigrun on another Oracle VM. We can see that the IP addresses used internally by the VM are:
10.0.2.15
(eth13) and10.0.3.15
(eth14)
From the above, and checking the documentation associated with the pre-built Oracle VM, we know that the IP address used by the Oracle database within the VM is
10.0.2.15. Since we’re using a NAT network configuration (leveraging off the host computer’s IP address), VirtualBox Port Forwarding rules rules need to be defined. These can be set by clicking on the Port Forwarding button that we saw in the VirtualBox network configuration screens that we saw in Step 3.
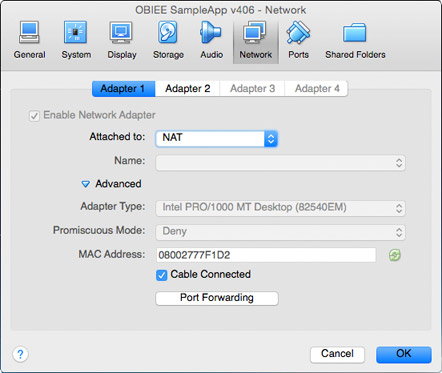
In the VirtualBox network configuration for your VM, choose Port Forwarding
This is enabled for NAT configurations only.
This is enabled for NAT configurations only.
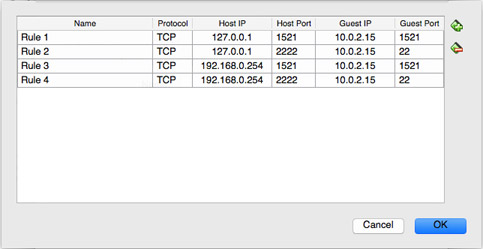
Add Port Forwarding rules:
- Port 1521 is required for database access.
- Port 22 is required for SSH access (recommend you make this port 2222 on your host so SSH connections to the host and Oracle VM can be differentiated).
- Additional rules may be required for other Oracle services (ODI, Enterprise Manager etc) if using them.
- Replicate the rules for 127.0.0.1 (localhost) and your host’s external IP address. This allows connections to be opened from the host and from other computers on your network.
Step 8: Test connectivity
When testing connectivity, its recommended that you first verify availability of services from inside the Oracle VM.
- This confirms that services are running and available.
- It could save you time and frustration attempting to get a connection from your Mac to a non-existent service.
Once you’ve confirmed that the services available, you can now try verifying connectivity from your Mac host, and from other computers on your network.
Telnet
This is a good first test. It basically just verifies that connections are being passed through (to somewhere) and not being blocked by firewalls or other issues. This is a simple connectivity test - independent of specific services or authentication.
In the first attempt below I attempt to connect to the ODIGettingStarted VM, which I’ve on a Bridged Network connection, with the IP address 192.168.0.100. However, in this instance I haven’t yet started the VM - so there is nothing to connect to.
$ telnet ODIGettingStarted 1521
Trying 192.168.0.100...
^C
Since there was nothing to connect to, the attempt to open a telnet connection on port 1521 was unsuccessful.
I needed to type Control+C to exit.
However, after starting the VM, I get the different result below.
I needed to type Control+C to exit.
However, after starting the VM, I get the different result below.
$ telnet ODIGettingStarted 1521
Trying 192.168.0.100…
Connected to odigettingstarted.
Escape character is '^]'.
^]
telnet> quit
Connection closed.
A connection was successfully obtained in this second attempt - proving that communication was available on port 1521.
SQL Developer
This verifies that you can access the database, and execute queries, from the development tools installed on your host computer - and potentially from other computers connected to your network also. Obviously you need to have Oracle SQL Developer (and Oracle instantclient) installed on your host computer already. If you don’t the Mac versions can be downloaded from here:
Assuming the tools are installed, you’ll need the correct details to create the Oracle connection.
The easiest way to get these is simply to open the pre-configured SQL Developer instance installed within your Oracle VM, and then copy the settings - making minor modifications as required.
In the first example, SQL Developer is being configured to connect to an Oracle database within a VM using a Bridged Network connection.
- This service won’t do anything with telnet, so I just type the escape character advised (Control+]). This returns me to the telnet prompt so that I can exit.
- But, at least, I now have verification that connectivity on the target port is possible.
SQL Developer
This verifies that you can access the database, and execute queries, from the development tools installed on your host computer - and potentially from other computers connected to your network also. Obviously you need to have Oracle SQL Developer (and Oracle instantclient) installed on your host computer already. If you don’t the Mac versions can be downloaded from here:
- Oracle instant client - needed for basic Oracle connectivity
- Oracle SQL Developer - recommended for database queries and development (Toad for Mac is an alternative).
Assuming the tools are installed, you’ll need the correct details to create the Oracle connection.
The easiest way to get these is simply to open the pre-configured SQL Developer instance installed within your Oracle VM, and then copy the settings - making minor modifications as required.
In the first example, SQL Developer is being configured to connect to an Oracle database within a VM using a Bridged Network connection.
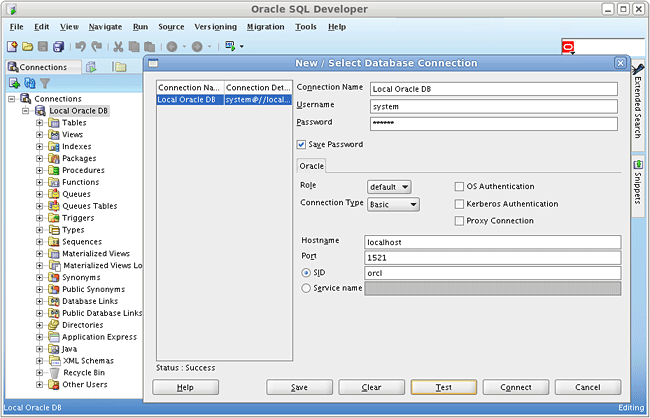
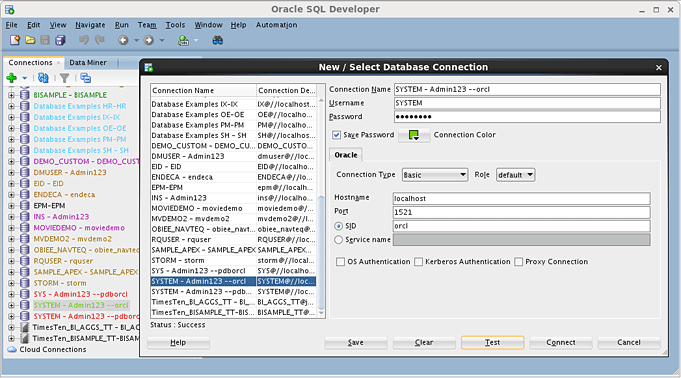
Open the pre-configured SQL Developer instance within the Oracle VM.
- Verify connectivity by clicking Test.
- Note the settings used.
We’ve replicated the same settings on the Mac host - except:
- Hostname has been changed to the VM’s network IP address.
- I erroneously specified “orcl” as a Service Name instead of a SID. Luckily they’re interchangeable in this case.
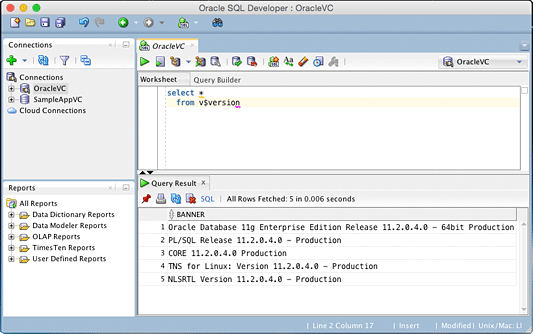
Once the connection has been created, I test it by running a simple query.
The results display details about the database installed in the Oracle VM.
The results display details about the database installed in the Oracle VM.
In the above example, I could also have used the VM’s hostname (ODIGettingStarted) instead of it’s IP address (192.168.0.100). This will work so long as the connecting computer has a corresponding entry in it’s /etc/hosts file.
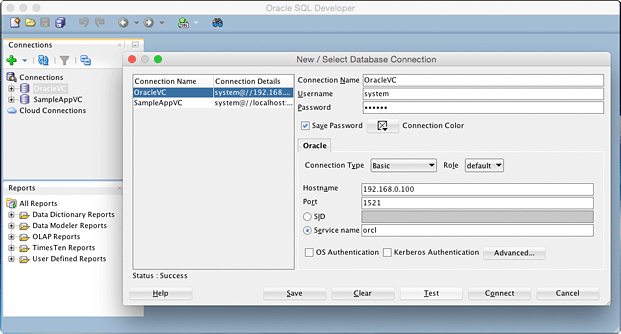
The example below shows the setup for connecting to an Oracle database within a Virtual VM using Network Address Translation (NAT).
The example below shows the setup for connecting to an Oracle database within a Virtual VM using Network Address Translation (NAT).
Open the pre-configured SQL Developer instance within the Oracle VM.
- Verify connectivity
- Note the settings used
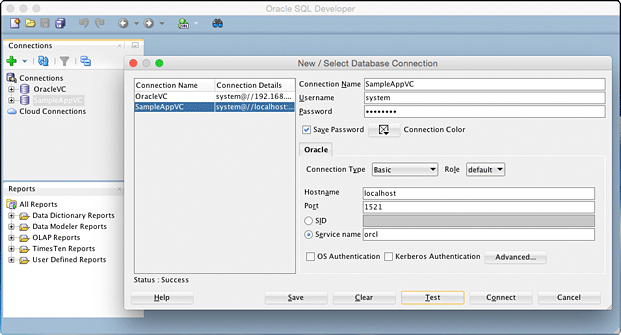
We’ve replicated the same settings on the Mac host:
- Localhost only works because this is running on the host (and port forwarding is set).
- If connecting from another computer I’d need to use the host’s IP address (192.168.0.254) or hostname.
- I again erroneously specified “orcl” as a Service Name instead of a SID - but it works.
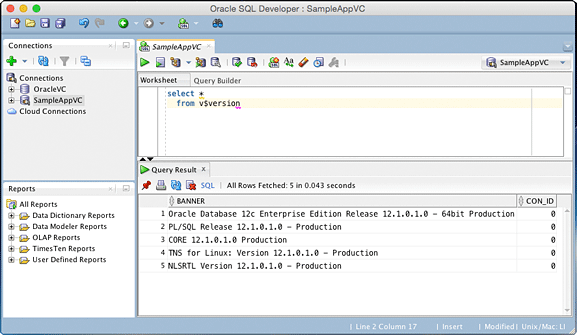
I repeat the same test query as used in the first example.
In this case I’m connecting to a Oracle 12c database.
In this case I’m connecting to a Oracle 12c database.
SQLPlus
Connections using SQLPlus are more complicated. Because of their reliance on TNS and a listener (with a corresponding hostname/address set in listener.ora), it usually only works on VMs using Bridged Network connections. It may also depend on having tnsnames.ora and Oracle environment variables properly set on your client computer. The configuration of Oracle Instant Client and tnsnames.ora will be explained more in a later post - but if properly configured, you should be able to launch SQLplus and connect to the Oracle database in your VM from Mac Terminal entering a command in the following format.
For example:
This allows us to repeat the same test query as we executed through SQL Developer.
Connections using SQLPlus are more complicated. Because of their reliance on TNS and a listener (with a corresponding hostname/address set in listener.ora), it usually only works on VMs using Bridged Network connections. It may also depend on having tnsnames.ora and Oracle environment variables properly set on your client computer. The configuration of Oracle Instant Client and tnsnames.ora will be explained more in a later post - but if properly configured, you should be able to launch SQLplus and connect to the Oracle database in your VM from Mac Terminal entering a command in the following format.
sqlplus username/password@hostname:port/SID
For example:
sqlplus system/oracle@ODIGettingStarted:1521/orclor
sqlplus system/oracle@192.168.0.100:1521/orcl
This allows us to repeat the same test query as we executed through SQL Developer.
$ sqlplus system/oracle@ODIGettingStarted:1521/orcl

SQL*Plus: Release 11.2.0.4.0 Production on Mon Dec 01 19:49:49 2014
Copyright (c) 1982, 2013, Oracle.  All rights reserved.

Connected to:
Oracle Database 11g Enterprise Edition Release 11.2.0.4.0 - 64bit Production
With the Partitioning, OLAP, Data Mining and Real Application Testing options

SQL> select * from v$version;

BANNER
--------------------------------------------------------------------------------
Oracle Database 11g Enterprise Edition Release 11.2.0.4.0 - 64bit Production
PL/SQL Release 11.2.0.4.0 - Production
CORE	11.2.0.4.0	Production
TNS for Linux: Version 11.2.0.4.0 - Production
NLSRTL Version 11.2.0.4.0 - Production

SQL>
SSH
Getting an SSH connection to the server allows you to execute commands via Mac Terminal. This also lets you open SQLPlus on the VM independently from the TNS and instant client configuration on your local Mac.
If the VM is configured using a Bridged Network, you just need to provide the username and hostname (or IP address) that you assigned to the VM in Step 5. The SSH command should have the format:
For example:
Once connected you can then launch SQLPlus as illustrated below.
Getting an SSH connection to the server allows you to execute commands via Mac Terminal. This also lets you open SQLPlus on the VM independently from the TNS and instant client configuration on your local Mac.
If the VM is configured using a Bridged Network, you just need to provide the username and hostname (or IP address) that you assigned to the VM in Step 5. The SSH command should have the format:
ssh username@hostname
For example:
ssh oracle@ODIGettingStartedor
ssh oracle@192.168.0.100
Once connected you can then launch SQLPlus as illustrated below.
$ ssh oracle@192.168.0.100
oracle@192.168.0.100's password:
Last login: Sun Nov 30 21:13:00 2014 from 192.168.0.20
[oracle@ODIGettingStarted ~]$ sqlplus system/oracle@orcl

SQL*Plus: Release 11.2.0.4.0 Production on Mon Dec 01 23:04:48 2014

Copyright (c) 1982, 2013, Oracle.  All rights reserved.


Connected to:
Oracle Database 11g Enterprise Edition Release 11.2.0.4.0 - 64bit Production
With the Partitioning, OLAP, Data Mining and Real Application Testing options

SQL>
For VMs configured using Network Address Translation (NAT) and port forwarding rules, you’ll need to connect specifying the hostname or IP address of the host computer. You’ll also need to specify the port if the target SSH communication port on the host if its something other than port 22 (i.e. as per Step 7) above. The SSH command should have the format:
For example:
Once connected you can then launch SQLPlus as illustrated below.
ssh -p port username@ipaddress
For example:
ssh -p 2222 oracle@demoor
ssh -p 2222 oracle@192.168.0.254
Once connected you can then launch SQLPlus as illustrated below.
$ ssh -p 2222 oracle@192.168.0.254
oracle@192.168.0.254's password:
Last login: Mon Dec 01 07:17:18 2014 from 10.0.2.2
[oracle@demo ~]$ sqlplus system/Admin123@orcl

SQL*Plus: Release 12.1.0.1.0 Production on Mon Dec 01 07:27:20 2014
Copyright (c) 1982, 2013, Oracle.  All rights reserved.

Last Successful login time: Mon Dec 01 2014 01:10:13 -05:00

Connected to:
Oracle Database 12c Enterprise Edition Release 12.1.0.1.0 - 64bit Production
With the Partitioning, OLAP, Advanced Analytics and Real Application Testing options

SQL>
Useful References
- Dimitrios Liapis - How to install Oracle Database on Mac OS (Any Version). This is a great post explaining almost everything I needed but is based on a NAT-configured network, and didn’t allow me to connect via SQLPlus or OCI8. Changing to the Bridged Network described above fixed it.
- Job Oprel - A Short Guide to Networking in Oracle VirtualBox with Linux Inside. This provided additional useful information on the VirtualBox network configurations.
- Ryan Sechrest - Permanently share a folder between host (Mac) and guest (Linux) OS using VirtualBox. Enable files to be easily shared between the Oracle VM and the Mac host. Also see this related post from HelpdeskGeek.

Andrew Mercer
I'm a Business Intelligence and Data Warehousing consultant based in Brisbane, Australia. I've consulted on or managed several large BI systems in New Zealand, Australia and Latin America.

Contact Info
Please use the contact form on this site.
Or phone 04 5704 1640 (Australia)
Or phone 04 5704 1640 (Australia)
Navigation
Photos
Latest Articles

blog comments powered by Disqus